Regular roof maintenance is essential to keeping your house in good shape. Repairing cracked, curled, and missing shingles as soon as possible helps prevent water leaks and other damage.
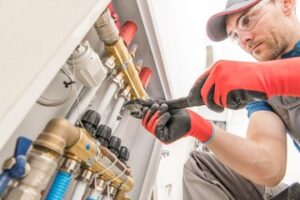
Proper ventilation in your attic allows hot air and moisture to escape, reducing the risk of shingle damage. Check for a blocked vent or insulation that obstructs airflow. Visit https://www.bostonroofingco.com/ to learn more.
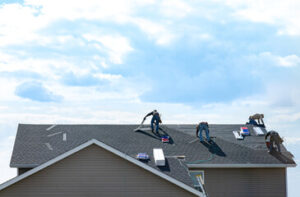
If you have a good ladder, you can safely inspect your roof from the ground. This can help you see shingle damage that might not be apparent from the street or a flat angle. Check for shingles on the ground, sagging areas or signs of water infiltration. Walk around the entire house, examining each side of the roof for shingles that appear damaged or missing. Also, take a look at your gutters and downspouts to make sure there aren’t any blockages or signs of damage.
If the shingles seem in poor condition, it might be time to have them replaced. You might also notice shingle granules in the gutters, which is another sign that it’s time to have your roof repaired. The special granules give your shingles their color, but they also perform other important functions. If they are scraped off, they expose the underlying asphalt layer that can eventually fail and lead to leaks in your home.
You can also look for moss, algae or piles of rotting leaves on the roof. These green materials soak up rainwater and moisture, causing the wood sheathing beneath to rot. If left unaddressed, this can cause significant roof leaks and structural damage to your home.
The inspector will also examine the condition of the flashing, which is the thin metal strips that redirect water from penetrations (skylights, chimneys and vent pipes) in your roof. These are often the first areas to show signs of wear and tear, and if they’re dented or rusty, or the caulk is brittle or cracked, then water may start getting into your roof’s interior structure, causing rot and mold.
The inspector will also examine fascia and soffit boards, which are the vertical boards that run along a roof’s edges, as well as any associated gutters for damage or rot. He or she will also look at the rafters and insulation inside your attic for any signs of water leaks or moisture problems that might not be visible from outside. If the attic inspection reveals any potential issues, a professional roofing company will be able to address them for you.
Check the Attic
The attic is a great spot for finding issues that you may not have been able to see from outside the house. Home inspectors often check for things like leaks, rust around roof vents and chimneys, sagging trusses and other structural problems from the attic, but you can also perform this inspection on your own on a sunny day by waiting for daylight to shine through any spots where water is leaking or mold is growing.
A well-functioning ventilation system in the attic is vital to extending the lifespan of your roofing materials. It prevents condensation and mold, as well as ice dams that can damage the roof and gutter systems.
Make sure your attic vents are clear of insulation, wood, rusted nails and pest droppings, and that there is a clear pathway to the exhaust stacks. If the attic insulation is old, consider replacing it with a new layer to improve ventilation and reduce your energy costs.
Leaks are usually easy to identify, but be careful when you call them active if you can’t confirm that the area is damp. If you find water stains and a sagging ceiling, contact a professional to inspect and repair the roof.
If your shingles are deteriorating or loose, now is the time to replace them. In addition to reducing your energy bills, a fresh coat of shingle protects the underneath layers from moisture and sun damage.
It’s a good idea to wear a dust mask, eye protection and safety shoes or boots when you enter the attic. It’s easier to slip through joists than you might think, and a fall could be dangerous or deadly. To avoid this, try to do your attic inspection on a sunny day and walk only on the joists or rafters, not on the exposed ceiling drywall.
If you don’t have a home inspector to assist you in checking your attic, a pro will use specialized tools to locate difficult-to-see areas of the roof and the framing. They’ll also recommend repairs or further evaluations and suggest maintenance techniques. They’ll take into account your needs, budget and timeframe to help you plan your next steps.
Check the Rafters
Although they are not visible from the ground, roof rafters are critical to your home’s structure. They bear the weight of the roof covering and distribute it evenly to the walls of the building. They also play a role in the energy efficiency of the home. Proper design and installation of rafters, as well as regular maintenance checks, help keep your roof in good condition.
When a rafter is damaged, it can weaken the overall integrity of the roof and compromise the structural stability of the house. If the damage is severe, it may need to be replaced. A professional roofer will be able to provide a comprehensive assessment and recommend the best course of action.
Rafters are generally constructed from dimensional lumber. Popular choices include pine, fir, and spruce for their affordability and strength. However, some homeowners choose hardwoods for improved durability and load-bearing capacity. Inadequate rafter support can cause sagging or bowing in the roof, cracking or breaking under severe loads, and moisture damage. Insufficient support and inadequate load-bearing capacity can also occur if rafters are not sized appropriately for the span of the roof or if they are spaced too far apart.
While sagging or bowing can be caused by many factors, it is often the result of poor construction. Inadequate support can also occur if rafters are exposed to constant weight and pressure for extended periods of time. Other issues that can affect rafters are moisture damage, rot, and insect infestation.
In older homes, it is common to find rafters with no collar ties or strongbacks. While this is a quality issue, it isn’t usually considered serious unless the rafters are showing signs of sagging.
While rafters are still commonly used in the states, more and more homeowners are choosing trusses when building new homes. Unlike rafters, trusses have triangular webbing that allows for more support and stronger connections to other elements of the house. They can also help with insulation and ventilation, which reduces the amount of money a homeowner has to spend on utility bills. However, rafters remain the preferred option for builders and designers looking to add a traditional look to their homes.
Check the Ceilings
In addition to checking shingles, water damage and shingle lifting, it’s also a good idea to take a look at the ceilings to assess their condition. Stains in the ceilings often indicate that there is a leak above, and the source of the leak might be anything from roof damage to problems with HVAC vents, plumbing or old caulking in bathtubs and showers. A professional can locate the source of the problem and make any necessary repairs to prevent further water damage or mold growth.
A roof inspection can also include a check of the gutters and downspouts to ensure they are clean. It’s important to clear debris regularly to allow proper drainage and help avoid clogged gutters which can lead to soffit and fascia damage. During the winter months it’s especially important to regularly inspect the gutters and downspouts for ice damming and clogging.
It’s also a good idea to keep tree branches properly trimmed so they don’t hang over the roof and cause damage during storms. If you’re concerned about tree limbs getting caught in the wind during heavy storms, it’s a good idea to have a qualified tree trimmer evaluate your property on an annual basis.
Lastly, it’s always wise to periodically replace caulking around chimneys, vent pipes and skylights. As caulking expands and contracts depending on the weather, it can be susceptible to cracking and leaking. A professional can replace the caulking as needed and help prevent leaks.
A thorough roof maintenance program can catch many small, easily repairable issues before they become bigger problems that require expensive re-roofing or other work on the structure of your home. With a little routine care and regular inspections, your roof will last longer and continue to protect the rest of your home. Contact a professional roofing contractor to schedule an inspection and discuss a maintenance plan. Then you can relax and enjoy the benefits of a well-maintained roof!